Keyframe Essentials in After Effects
Keyframes are at the heart of animating in After Effects. But before we can jump into what they are and do, we need to talk about...
Interpolation
The magic of After Effects starts with this weird word, interpolation. This just means you don't have to animate frame-by-frame like the old Disney days to make an animation.
Here's Adobe's official definition: Interpolation is the process of filling in the unknown data between two known values. You set keyframes to specify a property’s values at certain key times. After Effects interpolates values for the property for all times between keyframes.
For example, you tell After Effects that at frame 12 a circle is on the left side of the screen and at frame 24 that circle is at the right side of the screen.
Then After Effects says, "Sweet, I'm on it."
It goes to work and it interpolates where that circle should be for each frame between frame 12 and frame 24. It spaces the circle out evenly between the right and left.
This is the basic function of interpolation, but let's go a level deeper...
Spacing
In order to talk about spacial interpolation (visual spacing) and temporal interpolation (timing), we need to talk about spacing and timing.
Spacing is the distance an object travels between frames.
The closer together the spacing, the slower that object appears to move.
The farther out the spacing, the faster that object appears to move.
The GIF below is a screen recording from After Effects. The purple dots represent the spacing.
Example A is a Bezier keyframe (you'll learn about this in just a minute) where the spacing feels more natural and less robotic.
Example B is a Keyframe (yep, you'll learn about this in a minute too). This is the default keyframe without any nice easing applied.
Also note that what I'm doing in the above GIF is manipulating the Motion Path.
This is all part of Spacial Interpolation... the visual representation of how After Effects is interpolating between keyframes.
But spacing doesn't exist without...
Timing
Timing is how many frames (aka. how much time) in which an action takes place.
The fewer frames an action takes place over, the faster the action appears to happen.
The more frames an action takes place over, the slower the action appears to happen.
And as you can see below, timing is also tied to spacing. The more time time, the more frames that need to be spaced out.
Interpolation that deals with time and changing the rate of change between the spacing is called Temporal Interpolation.
We'll get more into manipulating the rate of change (aka acceleration, aka easy ease, aka the graph editor) later. Just know that when you have spacing that isn't evenly divided, you've messed with temporal interpolation. Cool.
Honestly, once you get a hang of how to manipulate the motion path (aka spacial interpolation) and the timing/ease settings (temporal interpolation), it's possible you'll never hear anyone use the terms spacial and temporal interpolation! However, I do think it's good to learn what these things are so you have a full understanding of what's going on. Learn the rules before you break them.
Okay. NOW we're gonna talk keyframes.
Main Types of Keyframes
1. Linear Keyframe
This is the default keyframe and it's usually just a starting off point. This is because they create boring, mechanical looking animations. They create a uniform rate of change and don't have any "life" in them. So let's move on.
HOW: Create linear keyframes by clicking the stopwatch icon by any layer property.
2. Bezier Keyframe
There are a couple types of Bezier keyframes... plain ol' Bezier (the one I suggest using the most) gives you the most control. I would guess that 85% of my keyframes on a normal animation are these Bezier keyframes.
HOW: Create Bezier keyframes by selecting any keyframe(s) and right clicking > Keyframe Assistant > Easy Ease... or hit F9
Note: if you're on a Mac, you may need to the the fn (function) key before hitting F9.
The Continuous Bezier keyframes looks exactly like the one above, and it is used to create smooth rate of change. Select keyframe(s) and Hit Cmd+Shift+K to open the Keyframe Velocity to manually adjust the interpolation. I personally very rarely use this. But it's nice to know it's there.
3. Auto Bezier Keyframe
These suckers give you an automatically smoothed out transition. You don't have much control (less even than Continuous Bezier), but it's nice when you have something bending around a curve with an extra keyframe (used in the spacial interpolation) to make the motion path look just right.
HOW: Create this keyframe by Cmd (Ctrl) clicking on a keyframe.
4. Hold Keyframe
This keyframe freezes whatever value the animated property is at until another keyframe in the timeline changes it. This is used a lot to freeze a video clip or to create a jumpy, strobe-like movement. It basically keeps After Effects from doing any interpolation.
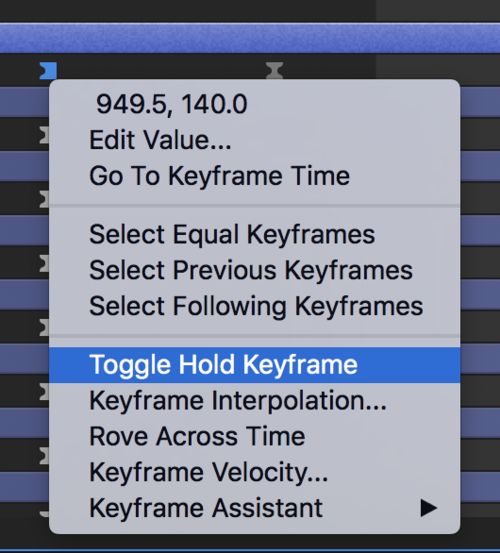
HOW: Create this keyframe by selecting the keyframe(s) and right clicking > Toggle Hold Keyframe.
… or CMD + OPT (CTRL + ALT) clicking on the keyframe(s)
The names of these keyframes are a lot less important than what they do for you.
Get into After Effects and test these out for yourself. And for heaven's sake, don't only use linear keyframes.
The next step is learning the graph editor ➠
Take the next step and learn the 4 Graph Editor Basics You Need to Know…


